Hi, it’s Kim from Katydid Cards with some mid-month
inspiration for you.
First, have you joined Connie Can Crop’s Candy Cane challenge this
month? If so, good for you!
If not, perhaps you can make a project using
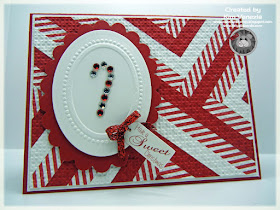
the Herringbone technique with the help of this tutorial. First, a picture of the finished card, so you can see what
we’re working towards.
Cut a piece of card stock to the desired size. My example was cut to 4” x 5 1/4". (This can be scrap paper as it won’t show in
the finished project) Cover the entire
surface area with adhesive. I used an
ATG and ran lines of adhesive horizontally and vertically, filling in open
areas as necessary. (A Xyron or adhesive sheets would work perfectly for this)
Cut coordinating strips of patterned paper or card stock. (The
strips can be cut in widths from 1/8” to 3/8” or you can vary the widths if you
like. You should use a minimum of three
separate patterns/colors, but you can use more.) For my example I cut all my strips to 3/8”,
two solid card stocks and one patterned paper.
Take the darkest/boldest color or pattern and place the
first strip on an angle slightly off center.
You will build your Herringbone pattern from here.
Apply two more strips of the same color/pattern on either
side of this center strip. You can trim
off the excess and use them to continue your pattern, but leave a slight
overhang. If you do reuse the strips, be
sure the ends are nice and straight…use a paper trimmer if necessary.
Now take your second color/pattern and align them next to
the previous strips. Be careful with your placement; you don’t want any space
between the strips.
Do the same with the third strip. Again, be careful not to allow any of the
background show between the strips.
Finish out your triangle, using the same order. Trim off the excess, but leave a bit of
overhang as you did previously.
Now fill in the three remaining triangles in the same
fashion.
Once done, burnish everything to the paper with a bone
folder to ensure good adhesion. I prefer
running it through the Big Shot with an embossing folder. I like the look and it eliminates any
difference between with depth of the card stock and the patterned paper while making sure everything is attached well. An embossing folder with an overall pattern (I
used Stampin’ Up’s Square Lattice here) works best.
Once you burnish or emboss your panel, then you can trim off
the overhang. You want to wait until
this point in case the burnishing or embossing slightly shifts/lengthens your
pieces. Trim with a pair of paper snips
or with your paper trimmer.
I layered this panel on a 4 1/8” x 5 3/98” mat of white card
stock and attached that to a red card base.
When I embellished the front of the card, I kept my focal image on the
small size and off to one side to allow the Herringbone pattern to show. This is
a particularly good technique to help you use up your scraps.
Are you ready to try it?
We sure hope you do and don’t forget to share your project in the Candy
Cane challenge this Month.
For a printable .pdf technique tutorial, visit the Hints, Tips & Tutorials page on my blog and don't forget to say, "hello" if you visit.


Thank you for the wonderful step-by-step tutorial! I love your card and the herringbone pattern! Thank you Kim for the great inspiration!
ReplyDeleteYou're welcome, Carey! Glad you liked it and I hope to see one of your creations using this technique in the Candy Cane challenge!
DeleteI love this!! So cool! I am going to try it tonight!! Thanks!
ReplyDeleteGreat! It's really very easy. The bonus is it looks more difficult, LOL
DeleteI'm looking for Katydid Cards - the winner of my blog prize. Please see here: http://yourmemoriescanada.blogspot.ca/2015/12/scrapbook-cards-today-2016-creative.html
ReplyDelete