Wednesday, December 30, 2015

Design Team: Handmade Gift Holder

Pin It
Happy New Year Eve!!! 

It's Veronica from Vicky's Scrapping Passion with a card to hold the handmade gift I made for my daughter.

BTW, We had an amazing sponsor this month for Connie's blog hop last week! Betsy Flot is giving one of  her awesome book's, Progressions of Expressions Volume 2.


I made this charm holder for my daughter's handmade gift inspired by the ones made by Jody from Cre8n' Memories
Connie, sorry, I saw this idea too late otherwise I would have sent you one ;-)


 I made some changes to the original idea to adjust it to a regular size card and to hide the chain, I made a pocket. I remembered a chain holder I saw a while ago and made the straight cuts coming out of the punched holes to insert the chain without destroying the card, as you can appreciate bellow:


I hope you enjoy this fun and easy project and visit me to see more pictures of the other handmade gift I made for my secret sister.


I used some old CTMH papers (Believe) and the charm/glass topper are also from CTMH. You can get similar products in Connie's CTMH website.

Happy New Year Eve!!!


Don't forget to check out Connie's monthly Challenge! 

Connie Can Crop Challenge #41
due 11:59 P.M. Thursday, December 31st Pacific Time


Happy New Year Frosty- Paper Crafting World

Pin It
Hello my Crafty Friends!!
Connie here ready to share this  beautiful Tri Fold Card Cut File I created using a Paper Crafting World file.


Do you remember the Classic Frosty Cartoon that is played every year around Christmas? I have watched and loved Frosty ever since I can remember so when I saw this file by Paper Crafting World I knew I had to create something cute with it.


Frosty is adorable!! And so is that sweet little cardinal sitting on his shoulder. I just loved cutting him out and making him come to life on my Happy New Year Card.


Check out the store, there's so many amazing files. You can find a file for every need: digital, printable or even cuttable.
 Be sure to stop by Paper Crafting World and see all the great files waiting for you! 

Don't forget about Paper Crafting World's month long challenge. Grab the latest freebies and play along!
And
Don't forget to enter my challenge!!

Connie Can Crop Challenge #41 Only two more days!!
due 11:59 P.M. Thursday, December 31st
Pacific Time

I can't thank you enough for checking out my project. It means the world to me and I hope you truly enjoyed it. May it inspire you to create something wonderful!   Scrappy Hugs! 

Monday, December 28, 2015

You-Tube Tuesday- Happy New Year Crafting

Pin It


I hope everyone had a great holiday! I thought I would share a video with a simple Christmas layout. I am sure many of you have plenty of new Christmas photos you are now going to need to scrapbook. 


You could easily adapt this with any Christmas paper you may have in your stash. 
I hope something you saw in this video inspires you to get out there and get crafty!!
Have a great week!


Friday, December 25, 2015

Merry Christmas

Pin It

To all our friends near and far...we wish a Merry Christmas full of love, joy, and peace!
The Connie Can Crop Design Team
Connie, Angela, Daphne, Kim, and Veronica

Tuesday, December 22, 2015

Photo Christmas Card- Miss Kate Cuttables

Pin It

Hello my crafty friends!!

It's my day to post with  Miss Kate Cuttables so what better day than today to share my family's Christmas Card I created featuring Miss Kate Cuttables' darling SVG files!!

But first, did you know that Miss Kate Cuttables gives away a free file everyday?
YES, absolutely FREE. So what are you waiting for, head over there and get your free file now!!

I don't need to order my Christmas cards from a photo lab. I can design it myself using my own computer and SVG files from miss Kate. Then I just print them out here at home and send them off! Easy peasy and I know exactly what I am getting!!
So here is what I am sending out this year!

I can't thank you enough for checking out my project. It means the world to me and I hope you truly enjoyed it. May it inspire you to create something wonderful!   Scrappy Hugs!

Monday, December 21, 2015

Snowman Ornaments- 3 Girl Jam Day

Pin It
Hello my Crafty Friends!
Today is my  post with 3 Girl Jam and I am so excited to be able to share my project featuring the 3 Girl Jam products I love!

I will be back next time with another great Disney layout to share with you all but for today I wanted to share these adorable ornaments I made. I found the tutorial on pinterest and knew that I had to make them and use some 3 Girl jam product with them.

 I love the the noses light up with just the flick of a switch! So cute!! And my added vinyl eyes and glasses are just so fun. Much better than goggly eyes.
 These cuties use 3 Girl Jam Holiday Trim for added flair. The green and red striped ribbon makes the perfect bow and the silver cord is great for hanging them on your tree.


Be sure to stop by the store HERE and check out all the gorgeous lace and ribbons you can add to your layouts!

Items Used:
Dollar Tree Plastic Snowflakes
Dollar tree Tea Candles (battery operated)
Pipe Cleaners
Pom Poms
Black Sharpie Pen for mouth
Red, green, and black vinyl for eyes and glasses
Silver Cord and Green/red ribbon from 3GJ Holiday Trim


SPECIAL NOTE:  To get 10% off of your entire order from 3 Girl JAM, use discount code CW10. 

Don't forget to check out my New Challenge!!

Connie Can Crop Challenge #41
due 11:59 P.M. Thursday, December 31st
Pacific Time


I can't thank you enough for checking out my project. It means the world to me and I hope you truly enjoyed it. May it inspire you to create something wonderful!   Scrappy Hugs!

Sunday, December 20, 2015

Question of the Week

Pin It


Remember.. I want you to answer the question in the comment section too!
AND
if  you have a question to ask for an upcoming week add that in the comments too, if you ask a question and I use it you will win a prize!!


This week's question comes from follower KT Fit Kitty!! Congrats KT Fit Kitty you win a prize since we are using your question. Be sure to send me an email or message!!

Here is this week's question:
I would like to know if anyone else has a problem parting with the cards they make. I was going through my handmade Christmas cards last night to decide which card would go to which person and I ended up pulling out a few to keep myself because I like them so much! Maybe I'll be ready to part with them next year... or maybe not. -

Connie- I do have that problem sometimes too. LOL! So I just learned that I need to make an extra one for me always. So now most of my cards get made in duplicates. Sometimes I still end up giving my extra away but the really great ones I keep!

DaphneI have had that problem. Sometimes it's because I love them so much. Other times it's because I know the person I am getting ready to send it to is just going to toss it after the holidays and it makes me sad.

Angela If I really love the card, I'll make a second one so I can keep one for myself!

Veronica- Lol, the same here, I try to take pictures of my cards to keep the memory or to try to make them again, which I end up never doing... I just had a hard time parting with my last project though...

Kim-  I did until this year when I came to the realization I was taking up valuable storage space by hoarding cards...the result being I would fail to send someone a card because I didn't want to part with anything and couldn't find time to make a new card. Tisk Tisk! Now I'm not only giving cards for occasions, I'm also giving out little bundles to friends and for contests on my blog. I also don't sign my cards; rather, I put a little insert with my personal note. That way, they can give the card to someone new.

ok, It's your turn to answer!!


Our new challenge is up and we have an amazing sponsor!!

Connie Can Crop Challenge #41
due 11:59 P.M. Thursday, December 31st
Pacific Time

Saturday, December 19, 2015

Sketchy Saturday

Pin It

 Hello, this is Veronica from Vicky's Scrapping Passion, and 
today I am sharing with you this fun sketch I found looking for inspiration for a card or layout from:
Little Red Wagon

 , 


I love the simplicity and versatility of this sketch and I hope you do too. This blog also host a sketch, if you decide to participate, please don't forget to mention that we are sending you ;-)
And let us know in your comment so we can also see your creations.


And Say hi.


And please don't forget the 41st Connie Can Crop Monthly Challenge!!  This month the theme is:

11898530_10155960693495274_6091647502773401056_n
You have until midnight Monday December 31st to link it up.

Thursday, December 17, 2015

Happy B-day Sweet 16 Blog Hop

Pin It
  Welcome to Emily's
Surprise 16th
Birthday Blog Hop


Hi friends!! Thank you for joining us today as we celebrate Emily's recent Sweet 16th Birthday! Shh, it's a surprise so don't tell her!! We're so thankful you've joined us to celebrate the sixteenth birthday of a fun loving young lady. She will be blessed by your participation, designs and comments.
You should be arriving from CATHY's blog. If so,GREAT if not, please check out the bottom of my blog for a complete list of the blog line-up.

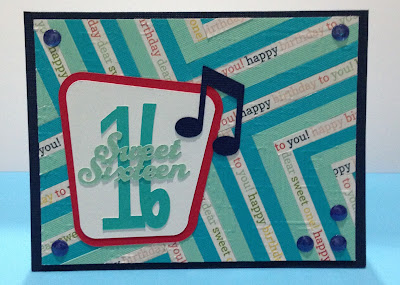
Here is my card created special for Emily

 I had a ton of fun creating this background using Kim's tutorial from earlier this week!
Love the way the strips of paper came out using the Happy Birthday print and Emily's favorite colors teal and aqua. The sweet 16 design I created using my Explore and various Cricut carts. I added the music note because Emily loves music! 


What is a blog without candy, If you are a follower of The Crafty Scrap Yard just leave a comment here along with the other blogs in today's hop and you'll be entered to win two sets of Cardz TV stamp sets! "Make A Wish" and "Girl Talk" both sets that will help you celebrate a birthday celebration or a girl in your life!


"Your next stop along the hop is at the crafty MARIA's blog."


Remember some of the other designers are also giving away blog candy too, so don't forget to visit everyone, read carefully and become a follower of all blogs, and leave some comment love!

I'll use random.org to pick a winner and announce the winner on Wednesday, Dec 23rd. So grab your favorite beverage, and join us for lots of fun and inspiration! 

Here's the line-up for "Emily's Surprise 16th Birthday" Blog Hop! If you get lost while hopping come back here to check the list and find your way again!
  1. Beth ~http://thecraftyscrapyard.blogspot.com
  2. Mary - http://cardztv.blogspot.com
  3. Shawnee - http://sunshinycards.blogspot.com
  4. Thia - http://bluemooncreation.blogspot.com
  5. Ellen- http://www.cardmonkeyspaperjungle.com
  6. Janis-http://pausedreamenjoy.blogspot.com
  7. Jennifer R- http://www.craftycardgallery.blogspot.com
  8. Rachelle-http://rachellescreativeplace.blogspot.com
  9. Krystal - http://krystalklearcreations.blogspot.com
  10. Cathy-http://mimiscraftcorner.blogspot.com
  11. Connie- http://conniecancrop.blogspot.com
  12. Maria - http://maria-linacreativedesigns.blogspot.com
  13. Jessica D. - http://craftinandstampin.blogspot.com
  14. Georgia- http://www.geritolgal2.blogspot.com
  15. Julie - http://muddypawsinkyfingers.blogspot.com
  16. Barbara - http://www.spotofsanity.blogspot.com
  17. Jessica P - http://www.kissinkrafts.blogspot.com


Thank you for hopping with us today and celebrating Emily's special day! We hope we inspired you to get scrappy today!!

Design Team ~ Progressions of Expressions

Pin It
Hello! 
Its Angela from 3*crazy*monkeys with a Christmas card for you! 

We had an amazing sponsor this month for Connie's blog hop last week! Betsy Flot is giving one of  her awesome book's, Progressions of Expressions Volume 2.


For my project today, I created a simple, yet pretty (well I think so anyway! lol) Christmas card. 


I have a ton of blank card bases in my stash and I need to use them up! I added a piece of shimmer recollections navy card stock to the base, which I embossed using a cuttlebug folder (not sure of the name?) Then, using DS, I cut out the snowflake (from When its Cold Outside)  and I made the band around the card. I added one of Connies enamel dots to the center of my flake (you can find the link for them HERE!) I took a saying from Betsey Flot's book and used the pen/writing feature on the explore to write on the inside. 


Don't forget to check out Connie's monthly Challenge! 

Connie Can Crop Challenge #41
due 11:59 P.M. Thursday, December 31st Pacific Time


Wednesday, December 16, 2015

Winner Wednesday

Pin It


Thanks to everyone who hopped along with us. 
We hope you enjoyed our merry Santa projects!


Now for our Big Winner....

Our winner chosen by random is:
True Random Number Generator  18Powered by RANDOM.ORG
Number 18
Wohoo!!

That's you Miranda!!!
Congratulations!
You are going to love this book!!


We are so excited to announce our sponsor is going to Betsy Flot. She is giving one lucky hopper her awesome book
Progressions of Expressions Volume 2.
With over 9,000 titles and quotes for scrapbooking, cards and other crafting!
Please visit her website HERE
you can find her on facebook HERE

Don't forget to send me your info (Full name and address) ASAP so I can forward it on to our awesome sponsor! Message me on FB or email me at conniecancrop@yahoo.com


Thanks to all the crafty gals who shared their amazing projects!! 
And for the rest of my crafty friends...don't forget this month's fun challenge!!

Connie Can Crop Challenge #41
due 11:59 P.M. Thursday, December 31st
Pacific Time

Monday, December 14, 2015

Challenge DT Inspiration Post

Pin It

Hi, it’s Kim from Katydid Cards with some mid-month inspiration for you.

First, have you joined Connie Can Crop’s Candy Cane challenge this month?  If so, good for you!  

If not, perhaps you can make a project using the Herringbone technique with the help of this tutorial.  First, a picture of the finished card, so you can see what we’re working towards.


Cut a piece of card stock to the desired size.  My example was cut to 4” x 5 1/4".  (This can be scrap paper as it won’t show in the finished project)  Cover the entire surface area with adhesive.  I used an ATG and ran lines of adhesive horizontally and vertically, filling in open areas as necessary. (A Xyron or adhesive sheets would work perfectly for this)


Cut coordinating strips of patterned paper or card stock. (The strips can be cut in widths from 1/8” to 3/8” or you can vary the widths if you like.  You should use a minimum of three separate patterns/colors, but you can use more.)  For my example I cut all my strips to 3/8”, two solid card stocks and one patterned paper.


Take the darkest/boldest color or pattern and place the first strip on an angle slightly off center.  You will build your Herringbone pattern from here.

 
Apply two more strips of the same color/pattern on either side of this center strip.  You can trim off the excess and use them to continue your pattern, but leave a slight overhang.  If you do reuse the strips, be sure the ends are nice and straight…use a paper trimmer if necessary.


Now take your second color/pattern and align them next to the previous strips. Be careful with your placement; you don’t want any space between the strips.


Do the same with the third strip.  Again, be careful not to allow any of the background show between the strips.


Finish out your triangle, using the same order.  Trim off the excess, but leave a bit of overhang as you did previously.


 Now fill in the three remaining triangles in the same fashion. 


Once done, burnish everything to the paper with a bone folder to ensure good adhesion.  I prefer running it through the Big Shot with an embossing folder.  I like the look and it eliminates any difference between with depth of the card stock and the patterned paper while making sure everything is attached well.  An embossing folder with an overall pattern (I used Stampin’ Up’s Square Lattice here) works best.


Once you burnish or emboss your panel, then you can trim off the overhang.  You want to wait until this point in case the burnishing or embossing slightly shifts/lengthens your pieces.  Trim with a pair of paper snips or with your paper trimmer.


I layered this panel on a 4 1/8” x 5 3/98” mat of white card stock and attached that to a red card base.  When I embellished the front of the card, I kept my focal image on the small size and off to one side to allow the Herringbone pattern to show.   This is a particularly good technique to help you use up your scraps.

Are you ready to try it?  We sure hope you do and don’t forget to share your project in the Candy Cane challenge this Month.

For a printable .pdf technique tutorial, visit the Hints, Tips & Tutorials page on my blog and don't forget to say, "hello" if you visit. 

Blogger Wordpress Gadgets