Thursday, December 17, 2015

Happy B-day Sweet 16 Blog Hop

Pin It
  Welcome to Emily's
Surprise 16th
Birthday Blog Hop


Hi friends!! Thank you for joining us today as we celebrate Emily's recent Sweet 16th Birthday! Shh, it's a surprise so don't tell her!! We're so thankful you've joined us to celebrate the sixteenth birthday of a fun loving young lady. She will be blessed by your participation, designs and comments.
You should be arriving from CATHY's blog. If so,GREAT if not, please check out the bottom of my blog for a complete list of the blog line-up.
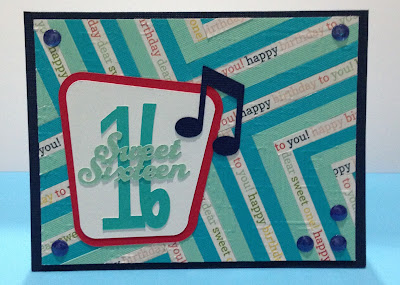
Here is my card created special for Emily

 I had a ton of fun creating this background using Kim's tutorial from earlier this week!
Love the way the strips of paper came out using the Happy Birthday print and Emily's favorite colors teal and aqua. The sweet 16 design I created using my Explore and various Cricut carts. I added the music note because Emily loves music! 


What is a blog without candy, If you are a follower of The Crafty Scrap Yard just leave a comment here along with the other blogs in today's hop and you'll be entered to win two sets of Cardz TV stamp sets! "Make A Wish" and "Girl Talk" both sets that will help you celebrate a birthday celebration or a girl in your life!


"Your next stop along the hop is at the crafty MARIA's blog."


Remember some of the other designers are also giving away blog candy too, so don't forget to visit everyone, read carefully and become a follower of all blogs, and leave some comment love!

I'll use random.org to pick a winner and announce the winner on Wednesday, Dec 23rd. So grab your favorite beverage, and join us for lots of fun and inspiration! 

Here's the line-up for "Emily's Surprise 16th Birthday" Blog Hop! If you get lost while hopping come back here to check the list and find your way again!
  1. Beth ~http://thecraftyscrapyard.blogspot.com
  2. Mary - http://cardztv.blogspot.com
  3. Shawnee - http://sunshinycards.blogspot.com
  4. Thia - http://bluemooncreation.blogspot.com
  5. Ellen- http://www.cardmonkeyspaperjungle.com
  6. Janis-http://pausedreamenjoy.blogspot.com
  7. Jennifer R- http://www.craftycardgallery.blogspot.com
  8. Rachelle-http://rachellescreativeplace.blogspot.com
  9. Krystal - http://krystalklearcreations.blogspot.com
  10. Cathy-http://mimiscraftcorner.blogspot.com
  11. Connie- http://conniecancrop.blogspot.com
  12. Maria - http://maria-linacreativedesigns.blogspot.com
  13. Jessica D. - http://craftinandstampin.blogspot.com
  14. Georgia- http://www.geritolgal2.blogspot.com
  15. Julie - http://muddypawsinkyfingers.blogspot.com
  16. Barbara - http://www.spotofsanity.blogspot.com
  17. Jessica P - http://www.kissinkrafts.blogspot.com


Thank you for hopping with us today and celebrating Emily's special day! We hope we inspired you to get scrappy today!!

Design Team ~ Progressions of Expressions

Pin It
Hello! 
Its Angela from 3*crazy*monkeys with a Christmas card for you! 

We had an amazing sponsor this month for Connie's blog hop last week! Betsy Flot is giving one of  her awesome book's, Progressions of Expressions Volume 2.


For my project today, I created a simple, yet pretty (well I think so anyway! lol) Christmas card. 


I have a ton of blank card bases in my stash and I need to use them up! I added a piece of shimmer recollections navy card stock to the base, which I embossed using a cuttlebug folder (not sure of the name?) Then, using DS, I cut out the snowflake (from When its Cold Outside)  and I made the band around the card. I added one of Connies enamel dots to the center of my flake (you can find the link for them HERE!) I took a saying from Betsey Flot's book and used the pen/writing feature on the explore to write on the inside. 


Don't forget to check out Connie's monthly Challenge! 

Connie Can Crop Challenge #41
due 11:59 P.M. Thursday, December 31st Pacific Time


Wednesday, December 16, 2015

Winner Wednesday

Pin It


Thanks to everyone who hopped along with us. 
We hope you enjoyed our merry Santa projects!


Now for our Big Winner....

Our winner chosen by random is:
True Random Number Generator  18Powered by RANDOM.ORG
Number 18
Wohoo!!

That's you Miranda!!!
Congratulations!
You are going to love this book!!


We are so excited to announce our sponsor is going to Betsy Flot. She is giving one lucky hopper her awesome book
Progressions of Expressions Volume 2.
With over 9,000 titles and quotes for scrapbooking, cards and other crafting!
Please visit her website HERE
you can find her on facebook HERE

Don't forget to send me your info (Full name and address) ASAP so I can forward it on to our awesome sponsor! Message me on FB or email me at conniecancrop@yahoo.com


Thanks to all the crafty gals who shared their amazing projects!! 
And for the rest of my crafty friends...don't forget this month's fun challenge!!

Connie Can Crop Challenge #41
due 11:59 P.M. Thursday, December 31st
Pacific Time

Monday, December 14, 2015

Challenge DT Inspiration Post

Pin It

Hi, it’s Kim from Katydid Cards with some mid-month inspiration for you.

First, have you joined Connie Can Crop’s Candy Cane challenge this month?  If so, good for you!  

If not, perhaps you can make a project using the Herringbone technique with the help of this tutorial.  First, a picture of the finished card, so you can see what we’re working towards.


Cut a piece of card stock to the desired size.  My example was cut to 4” x 5 1/4".  (This can be scrap paper as it won’t show in the finished project)  Cover the entire surface area with adhesive.  I used an ATG and ran lines of adhesive horizontally and vertically, filling in open areas as necessary. (A Xyron or adhesive sheets would work perfectly for this)


Cut coordinating strips of patterned paper or card stock. (The strips can be cut in widths from 1/8” to 3/8” or you can vary the widths if you like.  You should use a minimum of three separate patterns/colors, but you can use more.)  For my example I cut all my strips to 3/8”, two solid card stocks and one patterned paper.


Take the darkest/boldest color or pattern and place the first strip on an angle slightly off center.  You will build your Herringbone pattern from here.

 
Apply two more strips of the same color/pattern on either side of this center strip.  You can trim off the excess and use them to continue your pattern, but leave a slight overhang.  If you do reuse the strips, be sure the ends are nice and straight…use a paper trimmer if necessary.


Now take your second color/pattern and align them next to the previous strips. Be careful with your placement; you don’t want any space between the strips.


Do the same with the third strip.  Again, be careful not to allow any of the background show between the strips.


Finish out your triangle, using the same order.  Trim off the excess, but leave a bit of overhang as you did previously.


 Now fill in the three remaining triangles in the same fashion. 


Once done, burnish everything to the paper with a bone folder to ensure good adhesion.  I prefer running it through the Big Shot with an embossing folder.  I like the look and it eliminates any difference between with depth of the card stock and the patterned paper while making sure everything is attached well.  An embossing folder with an overall pattern (I used Stampin’ Up’s Square Lattice here) works best.


Once you burnish or emboss your panel, then you can trim off the overhang.  You want to wait until this point in case the burnishing or embossing slightly shifts/lengthens your pieces.  Trim with a pair of paper snips or with your paper trimmer.


I layered this panel on a 4 1/8” x 5 3/98” mat of white card stock and attached that to a red card base.  When I embellished the front of the card, I kept my focal image on the small size and off to one side to allow the Herringbone pattern to show.   This is a particularly good technique to help you use up your scraps.

Are you ready to try it?  We sure hope you do and don’t forget to share your project in the Candy Cane challenge this Month.

For a printable .pdf technique tutorial, visit the Hints, Tips & Tutorials page on my blog and don't forget to say, "hello" if you visit. 

Friday, December 11, 2015

Santa Baby Blog Hop

Pin It

 Santa Baby slip a Cricut under the tree, for me!...
I’ve been an awful good girl
Santa baby, and hurry down the chimney tonight.
Come and trim my Christmas tree
With some ribbons bought at Hobby Lobby
I really do believe in you
Let’s see if you believe in me
Santa baby, forgot to mention one little thing, some bling
Rhinestones, sequins, or stickles will do
Santa baby, and hurry down the chimney tonight!

Connie Can Crop (that's me) is the elf in charge of this holiday Blog Hop.

This is a one day blog hop and we appreciate your leaving a comment for all of Santa's helpers!!

We are so excited to announce our sponsor is going to Betsy Flot. She is giving one lucky hopper her awesome book 
Progressions of Expressions Volume 2.
With over 9,000 titles and quotes for scrapbooking, cards and other crafting!
Please visit her website HERE
you can find her on facebook HERE


What do you need to do to win? Easy... become  a follower of each of the fabulous blogs in this hop and leave each of them a comment letting them know what you like best about their projects.


You will have until 10 pm Sunday to finish the hop and leave your comments.

Winner will be announced on Wednesday 12/16/15 here at Connie Can Crop.

Be sure to follow everyone and leave a comment along the way!

I attended a Holiday crop a few weeks ago and was lucky enough to be able to create this gorgeous hoop layout with Suzy West. I have never made an embroidery hoop project before and I just love it! I see many more in my future!

 I am a collector of Vintage Santa and this Prima paper line was perfect for this project! Santa Claus  is beautiful!
 Prima Poinsettias and holly leaves along with berries adorn this piece. This is proudly on display in my home with my other Christmas Decorations. It is a show stopper for sure. 

Recipe:
Embroidery Hoop
Prima Paper
chipboard letters
Gold ink
Brown ink
Poinsettias
berries and leaves
ribbons
doily 
pop dots


 Up next is Santa's Helper Cindy 

Here's our Jolly line up in case you get lost.


Don't forget to check out my New Challenge!!

Connie Can Crop Challenge #41
due 11:59 P.M. Thursday, December 31st
Pacific Time


I can't thank you enough for checking out my project. It means the world to me and I hope you truly enjoyed it. May it inspire you to create something wonderful!   Scrappy Hugs!


Freebie Friday!

Pin It

It's freebie Friday! Connie has an awesome hope on Saturday called "Santa Baby", so this weeks freebies will be all about Santa! 


Santa Hat by Birds Cards


Santa Stuck by Birds Cards


Santa's Sleigh by Digital Designs by Stephanie

Santa's Sleigh by Bea Original

Don't forget to check by Miss Kate Cuttables for their freebie of the day 


Please check out this month's challenge and enter! 


Click that above link to bring you right to the page with all details and the submission form! Can't wait to see what you make! 


Blogger Wordpress Gadgets